Make life easy, search the forum.

Discuss This will make you cringe ... in the Tiling Advice | Tile Forum area at TilersForums. USA and UK Tiling Forum

Reaction score
3
Please checkout the following advertisement.
Hi folks, I've signed up to ask for some advice. I know you'll wince as I'm a try-hard DIYer who's been trying very hard over the last couple of days (and a lot more "couple of days" here and there), since moving into our first home last year.

We're in a first-floor maisonette that was leaking (not loads, but a small drip, drip) from our shower into neighbour's flat below. Having initially re-applied sealant, the shower tray dropped as it's on a completely rotten base.

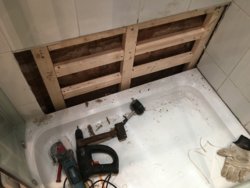
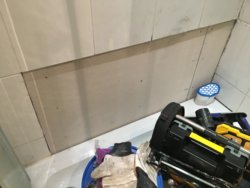
This weekend, I cut out and removed lower tiles within the shower enclosure, hooked out the rotten substrate and then put in new stud and cement board. This has been with the intention to buy us more time until we have the money to rip out the shower and retile the bathroom.

Because I've cut along the existing grout lines and popped new board in there, the tiles are going to be edged on the edge of the board, which (despite my best (but mediocre) efforts), has resulted in there being gaps exactly on the grout lines to each edge of the board.

I am asking you if I can fill the gaps around the edge of the board in order to lose the gaps and then prime in order to get a chance of waterproofing?

I know at the moment it's asking for trouble.

Ideally I would have ripped out the lot to start again. IDEALLY I would have the funds to get in an experienced tiler to do a proper job!

We've only one washing facility and there are 3 of us, so every day without the use of the room is a struggle.

We're in Chalfont St Giles, in case anyone is close and willing to take a look to quote.

I appreciate you're professionals and this will smack of the "I've f*cked up so how do I fix it?" but, if there's any way I can get us a bit of time without pulling out the entire bathroom I'd be able to sleep!

Thanks

IMG_3704.JPG IMG_3708.JPG IMG_3725.JPG IMG_3728.JPG
 
B

Bill

My 1st question is how do you know where the leak is coming from and the 2nd question is how did you deduce the answer to the 1st question?
 
OP
J
Reaction score
3
When we moved in there was old (very dry) damage to skirting and some plaster damage to adjoining walls, but it did seem to be old and in our minds, alright for a couple of years.

I undid the coupling from the shower and found a dodgy o-ring, which I replaced - dripping stopped.

The knock-on effect was the tray getting a bit slack (base of shower is rubbish and on a couple of now rotten 2x4) and adjoining grout and sealant being stretched.

I've now sealed around the gaps of the board with what Xtreme sealant we got via Amazon last night, though I am very aware this is sticking a plaster on an amputated limb ... Happy days ...
 
OP
J
Reaction score
3
I've also had a plumber visit before I started hacking, and his view was that there was currently no leak.

Having removed the old gear, the brickwork is dry, so seems (to my mind) to be a case of failed grout, plus sealant, and water being drawn all over the place.

It's all pretty dry having hacked off the rotten sh*te.
 
Last edited by a moderator:
OP
J
Reaction score
3
I intend to prime the board and silicone that I've used to fill the gaps before using Mapei Ultimate Showerproof to bed the tiles. The joins of the board are on the grout lines, which I am very uncomfortable with, though can this be done if I seal the grout when the grout has gone off?
 
OP
J
Reaction score
3
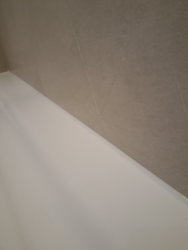
It's taken 5 days but I've now put tiles on the wall and grouted, followed by putting on Mapei's sealant, something which I just cannot do well when using a thick layer. I had bought my second finishing kit from Screwfix (comes in the green box with a variety of applicators), which were great on areas that needed less sealant though I struggled on the larger beads (seemed to be more suited to right-handers, when I am not).

Anyway, job is done, though still need to get additional support under the base to prevent further slacking of the base.

Tiles on the right are tarnished by the multitool used initially to remove old sealant.

I'm not happy with my application of the sealant, so would like an idea of what I would expect to pay for a pro to make it good?

Cheers!

Jon
 

Attachments

  • IMG_3745.JPG
    IMG_3745.JPG
    1.5 MB · Views: 30
Last edited:

Tony_C

TF
Esteemed
Arms
Reaction score
2,130
Not to sound silly here but are you using the Fugi (i'm assuming this is the sealant kit you bought) the right way? it's quite an easy mistake to make. You pull the complete flat edge to create the edge and not the side with text/numbers and bevils on
 
W

WetSaw

As above, and dip the tool into Fairy liquid before using it ( just the normal green stuff ). Probably be better taking that lot out, a good clean up with CT1 Multisolve ( other silicone removal sprays are available ) then do it again. A common mistake is cutting the nozzle too small. IMG_20190430_163722_439.jpg 20190506_180855.jpg
 
OP
J
Reaction score
3
Thanks Tony. Your comment reminded me that I've bought the Fugi in the past - no idea where that is now, having moved house since. I then bought the remover and applicator set from Screwfix with which I was not getting results I wanted, so this time around I bought the Screwfix No Nonsense set, using the flat edge on the base of the shower tray. I can do a small bead with a soapy finger but really struggle with anything else, despite my using Fairy in a spray to work the silicone and clean the applicator after each go.

Drives me nuts!
 
OP
J
Reaction score
3
As above, and dip the tool into Fairy liquid before using it ( just the normal green stuff ). Probably be better taking that lot out, a good clean up with CT1 Multisolve ( other silicone removal sprays are available ) then do it again. A common mistake is cutting the nozzle too small.

Cheers pdc. I was using Fairy, and for the first time, I didn't cut the nozzle as started the sealing to slowly ensure that I was filling the entire void beneath the tile. I made sure it was proud to allow there to be enough for the applicator to smooth.

I hear you on starting again, which pains me as we've not had use of the shower for a week and we've held off doing so and tomorrow going away for a couple of days to allow it to all cure before using the shower!


View attachment 106856 View attachment 106857
 
OP
J
Reaction score
3
Not to sound silly here but are you using the Fugi (i'm assuming this is the sealant kit you bought) the right way? it's quite an easy mistake to make. You pull the complete flat edge to create the edge and not the side with text/numbers and bevils on
Tony - I was pulling bevelled side on the kit I used, not the straight side! Argh!
 

Tony_C

TF
Esteemed
Arms
Reaction score
2,130
Tony - I was pulling bevelled side on the kit I used, not the straight side! Argh!

Whoops! like i said it is a pretty easy mistake to make, hopefully you can get the finish your after now :)

Just do it in small bits at the time as the excess silicone will eventually build up on the tool and just smear up and over the tiles then you can go over the full length at the end. soapy water will stop the excess sticking to the tiles and tool but I personally don't use the soapy water trick but that's just what works for me. It's definitely a love/hate task. more hate from me
 
Last edited:
OP
J
Reaction score
3
Whoops! like i said it is a pretty easy mistake to make, hopefully you can get the finish your after now :)

Just do it in small bits at the time as the excess silicone will eventually just smear up and over the tiles then you can go over the full length at the end. I personally don't use the soapy water trick but that's just what works for me. Its definitely a love/hate task. more hate from me
Good man - thank you very much! I dread the end of a job when a thick bead is needed - I know it's going to make me start muttering obscenities as I try, claw out, try, claw out, ad infinitum!

I just want the family to be able to shower - I turn 40 on Tuesday which should probably take place after a proper wash!

Thanks again :)
 

Reply to This will make you cringe ... in the Tiling Advice | Tile Forum area at TilersForums.com

Or checkout our tile training advice or the Tile Standards

This website is hosted and managed by www.untoldmedia.co.uk. Creating content since 2001.

New Tiling Questions

UK Tiling Forum Stats

Threads
66,600
Messages
866,701
Members
9,509
Latest member
flooringdemand
Top
AdBlock Detected

We get it, advertisements are annoying!

Sure, ad-blocking software does a great job at blocking ads, but it also blocks useful features of our website. For the best site experience please disable your AdBlocker.

I've Disabled AdBlock