Pan fixing

UK Tiling Forum; Established 2006

Welcome to the UK Tiling Forum by TilersForums.com, built in 2006 by Tilers, run by Tilers.

View all of the UK tiling forum threads, questions and discussions here.

D

Dr Bob

Before I start can I say I know this is a tiling forum, not a plumbers one, but when it comes to fixing ceramic things to surfaces I trust a tilers advice over a plumbers anyday!

So, the issue that I need some thoughts on...

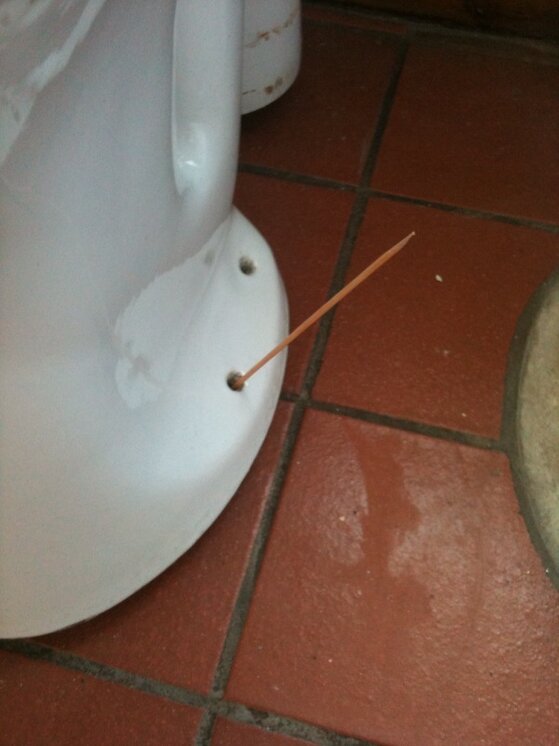
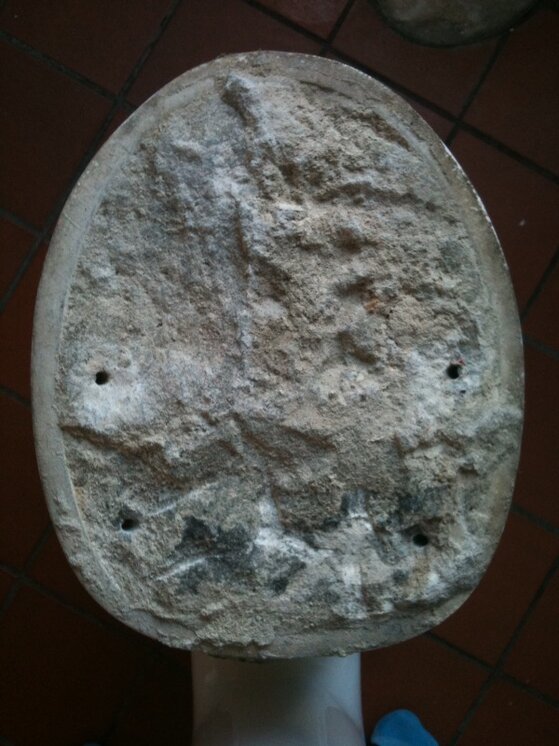
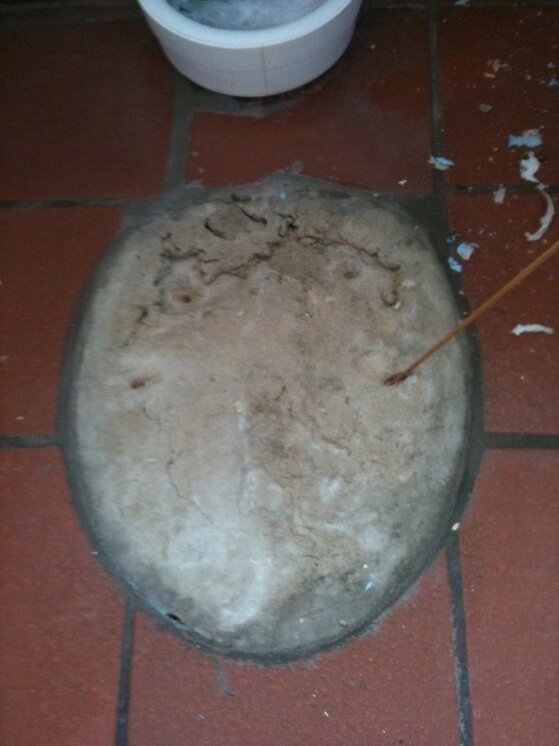
I have an existing toilet pan which rocks. On removal I find that it has been set on a mortar bed with four much-too-short brass screws for anchorage. The mortar appears a little crumbly in places so the screws have pulled out and the pan come away from the floor. I now have mortar on the floor and the negative impression on the base of the pan. In addition it has completely crumbled away round two of the screws leaving a void and the concrete floor beneath it visible.

So what would peoples suggestions be? I have thought of the follow so far, an comments welcome!

1) The plumbers way - ooze Silicon everywhere and glue it down
2) Carefully try to clean away the mortar, prepare a proper bed and rebed on mortar and screw
3) Much longer screws to get into the concrete floor, drilled and plugged for a proper job
4) Keraflex over the existing mortar and rebed

Many thanks,

Bob
 
Would that be clean the mortar off the floor but leave it on the base of the pan (reluctant to chip away at it for fear of fracturing the pan)?

Are you suggesting rebedding it and then adding the fixings when it had set.

Any good ideas for how to drill holes for the new fixings - they're at an angle. Surely if I try and do it through the pans holes I'm likely to shatter it?
 
If im reading this correctly.... the 2 screw holes have crumbled away leaving a gap which you can see through....

The pan fixing kits have big mushroom type plastic washers which a white or chrome cap will clip on to so you shouldnt see the gaps.

Me personally if its an old toilet and your own house get yourself a nice brand new toilet under £100 and fit it properly with the fixings.
 
To be fair, I used to Silicon pans down (with a neat bead around the base) and cut the screw heads off, and Silicon those into the screw holes. Reason being; you can remove the loo and put it back (somewhere else even) and not screw up the tiles. Etc.

Though if you've already got holes (if I'm reading it right) might be worth just cleaning off the motar and then fix with decent screws as Sir Ramic says, and those Fischer screws are VERY tight when fixed.

Is the pan fixed to tiles or what there? You haven't mentioned tile.
 
Thanks for the replies so far.

To clarify based on the above:

- the pan is in perfect condition so I'm reluctant to replace. This might require considerable replumbing as the cistern is a high level on on an adjacent wall.

- the mortar bed is 3/4", solid concrete floor below.

- the original screws only penetrated the mortar bed, not the concrete, hence them pulling free.

- the mortar surrounding the rear two screws has crumbled away. No fixing possible without significantly longer screws to penetrate concrete floor.

Any of this help? Pictures to follow if I can work out how to do it!
 
Here are some photos to hopefully clarify what the situation is.

I could chip away the old mortar, but risk the floor tiles.

This would also still leave me with the uneven mortar on the pan base.

I have measured up and the Fischer fixings at 82 mm would be long enough to go in to the concrete base, assuming I can drill and plug at the correct angle freehand.

If I can get a reasonable fixing with two sets of Fischer screws and use a bit of Silicon perhaps this would hold it?

Thoughts appreciated, thanks.

photo(1).jpgphoto(3).jpgphoto(4).jpgphoto(5).jpgphoto(6).jpgphoto(7).jpg
 
I see the dilemma. I personally think you will get the mortor off the floor. But there is the risk of damaging the surrounding tiles. So, providing the pan sits back in place and the mortorr is not loose. I'd drill through the pan directly down. Gently with about a 4mm masonary drill bit first. This will pilot you through the mortor to the concrete floor. Once you've got your mark in the mortor, use the appropriate bit to fit your plugs. Use the bolt to tap the plug into place, ensuring the plug goes beyound the mortor and again into the concrete floor.
Place the WC in situe and run a larger bit through the fixing holes on the WC. DO NOT USE a hammer drill. A new bit will get through without hammer action as you've already piloted through. You don't want to risk fracturing the pan.
Remove the WC again and clean out the dust from the holes, place the WC back in using a spanner not a socket or power tools. Wind the bolt through the fixings. Make sure you use a plastic or rubber washer and a metal washer. The rubber/plastic one is to go between the metal washer and the WC.
Silicon round the pan will be sufficient. But, if you want a bit more piece of mind find a stockist that has CT1. Use this to seal up with. It holds better than normal sanitary Silicon.
 
So you're suggesting I put the fixings in plumb to get round the need for trying to drill into the concrete floor at an angle?
 
That will be a nervous procedure for me! Hopefully I can pull it off without shattering the pan.

I now have the recommended Silicon and the incorrect fittings supplied by Screwfix (will exchange those for the correct ones!), so following your advice to the letter I shall attempt the repair this weekend.

Many thanks for your advice, much appreciated.
 
Whenever i fix down a s pan onto a concrete floor i always turn the pan upside down and fill the pan with mortar then put a fresh bed on the floor, turn the pan over (quick as you can) set the loo down firmly. Clean off the excess straight away, no screws needed and it won't move anywhere. As Dan says you can put cut off screw heads in for appearance.
 
The mortar is crumbly around the fixings but appears fairly solid over the rest of the bed. I'm reluctant to clobber it and find out its sound but damage the tiles in the process.

The only potential spanner in the works re drilling the holes plumb in the pan base is that I might struggle to get a drill in there because of the bowl above it. Might require a plan B if that turns out to be a problem!
 
Right angled drill? Or ammer and an old screwdriver to mark the position through the pan and drill the holes without it in situe.
 
Right angled drill? Or ammer and an old screwdriver to mark the position through the pan and drill the holes without it in situe.
I carry a bottle of tipex for that, brush isn't always long enough mind you but is O.K most of the time
 
I understand about marking with the pan in place, removing it and then drilling, but i thought the suggestion was to also make the holes in the pan vertical to get round the need for drilling the floor at an angle. I can't do that though because the bowl prevents getting a drill in so I'm not sure of the best course of action now...?
 
fill the old drill holes up with apoxy resin then re drill now use apoxy resin to re stick the toilet and scew back down
 

Advertisement

Thread Information

Title
Pan fixing
Prefix
N/A
Forum
UK Tiling Forum
Start date
Last reply date
Replies
21

Thread Tags

Advertisement

Tilers Forums Official Sponsors

UK Tiling Forum; UK

Thread statistics

Created
Dr Bob,
Last reply from
Rizzle from the Portizzle,
Replies
21
Views
6,209

Thread statistics

Created
Dr Bob,
Last reply from
Rizzle from the Portizzle,
Replies
21
Views
6,209
Back