Preparing A Concrete Floor For Tiling - Floor Has Bitumen Down

P

philrab66

Hi all
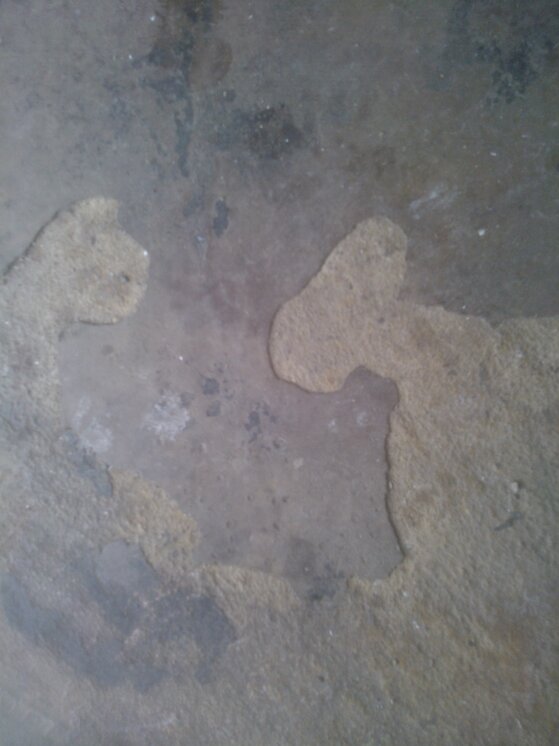
Got a concrete floor to tile just wondering if somebody could help me out with the prep. It has some glue or maybe bitumen on it on patches around 2-3 mm high. does this need to come off or could I get away with leaving it using a 10mm notch?. I have done a few tiling jobs but not really looked into doing things the correct way ( correct adhesive, priming and such). Will I need to prime the floor?
I am ashamed to admit that I have only mainly used tubbed adhesive because I was worried about it going off too quick because I am so slow. The only trade store I have locally is Topps so could somebody recommend what adhesives I should be using for this floor and for general wall tiling for in the future.
Would like to thank everybody in advance for your help and compliment the owners of the forum for a great site.
Phil.
 
tbh Phil, tiling is the easy bit, prepping it correctly is what makes it easy. If the bitumen and glue residue can't be removed I'd be first prepping it with a cement/sbr slurry coat, then a decent self levelling compound, weber or tilemaster being my preferred options. Once your slc has set then prime with appropiate acrylic primer. A 10mm radius solid bed trowel and a standard set (as you've stated you're not very fast)powder adhesive, trowel your adhesive onto the substrate, ie concrete floor and give your tile a skim coat to fill the studs and away you go.
 
tbh Phil, tiling is the easy bit, prepping it correctly is what makes it easy. If the bitumen and glue residue can't be removed I'd be first prepping it with a cement/sbr slurry coat, then a decent self levelling compound, weber or tilemaster being my preferred options. Once your slc has set then prime with appropiate acrylic primer. A 10mm radius solid bed trowel and a standard set (as you've stated you're not very fast)powder adhesive, trowel your adhesive onto the substrate, ie concrete floor and give your tile a skim coat to fill the studs and away you go.
Thanks Doug
Could you please advise me what the sbr does and how it is applied. So much to learn the proper techniques . Also if the bits do come off do I just use the primer. Thanks
Phil.
 
This is the material.
 

Attachments

  • WP_000234.jpg
    WP_000234.jpg
    817.9 KB · Views: 91
if your in n Allerton there is direct tile importers on standard way a lot better than topps
have you any experience or done any courses?
 
Thanks Doug
Could you please advise me what the sbr does and how it is applied. So much to learn the proper techniques . Also if the bits do come off do I just use the primer. Thanks
Phil.
the sbr/cement slurry is your best friend, it consolidates the existing substrate creating a dust free surface, gives you a good bond and interface between substrate and adhesive. If you do get the bitumen and glue residue up successfully then, yes. an acrylic primer to match your adhesive will be fine.
 
if your in n Allerton there is direct tile importers on standard way a lot better than topps
have you any experience or done any courses?
Hi Ray
Yes I normally use Direct tiles never used topps for anything surprised they are still in business there always empty. I am a Handyman by trade so I have done a few jobs mainly for landlords done a few bathrooms and kitchens. As I mentioned earlier not really approached it very well using correct materials but trying to learn.
 
the sbr/cement slurry is your best friend, it consolidates the existing substrate creating a dust free surface, gives you a good bond and interface between substrate and adhesive. If you do get the bitumen and glue residue up successfully then, yes. an acrylic primer to match your adhesive will be fine.
Cheers Doug do you just brush the slurry on?
 
yep, give the floor a good clean first, ie vacuum cleaner ideally as a broom just tends to bring up more dust.
Started to remove some bitumen and found floor has a large dip around 18mm it is in a kitchen through to a hallway so a large area, for me anyway. Can you get self leveller for that sort of thickness or will i need to use something else.
Thanks Phil.
 
Mapei Ultraplan Renovation Screed covers up to 30mm and is suitable for your requirements

Thanks Geoff
Just been reading a few old posts and that was has been recommended a few times. Could you please let me know how you would tackle this. The floor area consists of a hallway and a kitchen. There is a door at the hallway end and a door at the kitchen end. The hallway if fairly flat but when you get about half way into the kitchen the floor drops by about 18mm over around 6- 8 foot. Where would be the best place for me to start?
 
Find the lowest point and level it to meet the desired height elsewhere. A long level or laser will help
 
I use a plasterers float or a large floor squeegee
Thanks again Geoff. I will be doing it next week can I just run it through with you. SBR floor do you have to let that completely dry till next day? 1 or 2 coats
Batten off door ways
Have around 4 buckets with correct amount of water to start with
Start at lowest point spread to outside and corners
Work my way back up to higher level and carry on.
Have I missed anything important out?
 
Make sure it is an SBR slurry, not just SBR, and one coat will suffice. The rest of your plans are fine 🙂
 
Make sure it is an SBR slurry, not just SBR, and one coat will suffice. The rest of your plans are fine 🙂

Yes was going to do the slurry, Doug has mentioned before. Will let you know how I get on. I am doing it for a landlord we are doing the whole house up we where going to put lino down but he wants tiles so he doesn't have to replace it all the time. I have told him that I have never done it before (levelling). So he is paying me to learn and mixing for me so I am not to stressed about it but obviously want to learn how to do it properly.
Thanks again for your knowledge.
Phil.
 
Make sure it is an SBR slurry, not just SBR, and one coat will suffice. The rest of your plans are fine 🙂

Just found this on interweb for the SBR slurry is this ok
An SBR bonding slurry is recommended to improve the adhesion of cement based mixes onto surfaces of low suction, and also as a treatment prior to applying any SBR modified mix. To produce the bonding slurry dilute SBR Bonding Additive with an equal volume of water then mix to a smooth creamy consistency with ordinary Portland Cement. The approximate mix is 1 part SBR: 1 part water: 5 parts cement (by volume) giving an approximate coverage of 30m² per 5 litres of SBR per coat. Following preparation of the substrate as detailed above the bonding slurry should be brushed vigorously into the surface giving an approximate 1mm thickness. Subsequent coatings must be applied while the bonding slurry is still wet. Should the slurry dry then a further coat must be applied.
 
I very detailed techy reply but yes, it is correct. Don't fret about the last part where it says about drying, one even coat is just fine
 
I very detailed techy reply but yes, it is correct. Don't fret about the last part where it says about drying, one even coat is just fine
Hi Geoff
Can I just check one more thing do you have to wait for slurry to dry or when it is tacky?
Thanks Phil.
 
Find the lowest point and level it to meet the desired height elsewhere. A long level or laser will help

Got it down today it looks like there are a few dips in it. Looks like the sand has dropped into the hollows maybe to much water. Will see how it turned out tomorrow. Hopefully it will be good enough to tile on.
 
Any pictures?
Not good enough for pictures a right mess . I think It was a bit to much for me first attempt. There was a hump in the floor which is still there. I basically have what was there before but a bit higher. If it was just one room I think I would done ok but it was a kitchen through into hall.
 
Not good enough for pictures a right mess . I think It was a bit to much for me first attempt. There was a hump in the floor which is still there. I basically have what was there before but a bit higher. If it was just one room I think I would done ok but it was a kitchen through into hall.

U can get a grinding cup that fits to an angle grinder to reduce the size of the hump. Messy tho, but easier than latex!
 
U can get a grinding cup that fits to an angle grinder to reduce the size of the hump. Messy tho, but easier than latex!
It is across most of the room and about 2 foot wide so I was going to cut it out and try and level it up, to much to grind off.
 
Maybe an easier way for u then is to lay a thin runner that is level to the area u want to match and u can pour your latex and pull a straight edge over your runners to achieve a level surface. That might not make sense at first but here's an image of the technique. I use it myself sometimes if it's particularly complicated. Just remember to not pull too quickly because it'll drag the latex back out.

image.jpg
image.jpg
image.jpg


So set your runners level, packing them where necessary. Support them well because when u use a straight edge on them they will bend if u apply too much pressure
Pour in your latex and pull a metal straight edge back over the runners to achieve a level surface. Remove the runners after and fill in. It's fussy and time consuming but the end result is a perfectly flat and level floor. Which will halve your fixing time and save u a fortune in adhesive.
 

Advertisement

Thread Information

Title
Preparing A Concrete Floor For Tiling - Floor Has Bitumen Down
Prefix
N/A
Forum
Australia Tiling Forum
Start date
Last reply date
Replies
53

Advertisement

Tilers Forums Official Sponsors

UK Tiling Forum; UK

Thread statistics

Created
philrab66,
Last reply from
outcycling,
Replies
53
Views
21,746

Thread statistics

Created
philrab66,
Last reply from
outcycling,
Replies
53
Views
21,746
Back