Preparing A Concrete Floor For Tiling - Floor Has Bitumen Down

Maybe an easier way for u then is to lay a thin runner that is level to the area u want to match and u can pour your latex and pull a straight edge over your runners to achieve a level surface. That might not make sense at first but here's an image of the technique. I use it myself sometimes if it's particularly complicated. Just remember to not pull too quickly because it'll drag the latex back out.

View attachment 73559 View attachment 73560 View attachment 73561

So set your runners level, packing them where necessary. Support them well because when u use a straight edge on them they will bend if u apply too much pressure
Pour in your latex and pull a metal straight edge back over the runners to achieve a level surface. Remove the runners after and fill in. It's fussy and time consuming but the end result is a perfectly flat and level floor. Which will halve your fixing time and save u a fortune in adhesive.
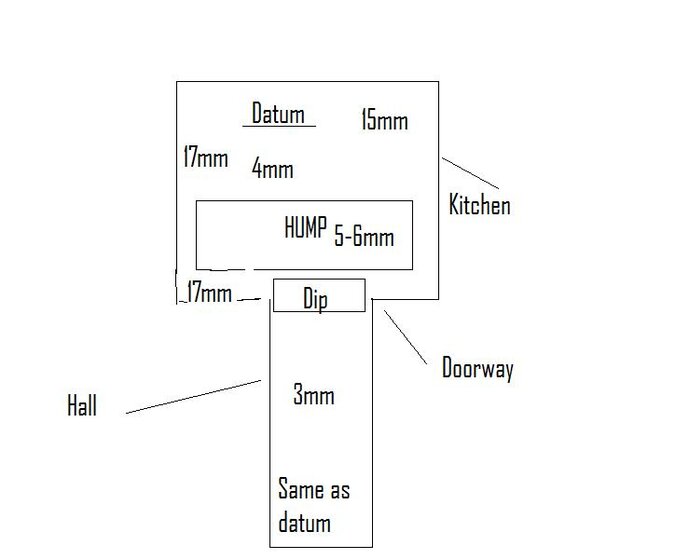
Thanks for that Freefall. Only trouble is I already have a layer down. I went round with a level today like this
and in some places it was around 17mm high from my datum and the bloke I am doing it for is not to amused we have already used 8 mixes on it. To do it again ?
I have uploaded a crude picture.
 

Attachments

  • Levels.jpg
    Levels.jpg
    23.5 KB · Views: 63
The measurements u've put in, u've not stated + or - your datum line. I'm assuming that 'the hump' u've marked is 5-6mm minus from ur datum, are the rest ur datum plus these measurements? Or am I reading it wrong?
 
The measurements u've put in, u've not stated + or - your datum line. I'm assuming that 'the hump' u've marked is 5-6mm minus from ur datum, are the rest ur datum plus these measurements? Or am I reading it wrong?
They are all high including hump.
 
You can drill and plug the concrete every 2ft or so in a grid-like pattern. Then set screws in level with each other. Pour the slc up to the heads to give you a perfectly flat floor. Its a time consuming method if you're tackling it on your own but it guarantees you a good floor.
 
You can drill and plug the concrete every 2ft or so in a grid-like pattern. Then set screws in level with each other. Pour the slc up to the heads to give you a perfectly flat floor. Its a time consuming method if you're tackling it on your own but it guarantees you a good floor.

Hi Rich thanks for post. I think I may try your suggestion I should have done this to start with. I want to check I am prepping the correct way for setting screws if you dont mind checking.
1. Set up laser anywhere in room
2. Find the highest point
3. Mark this on datum stick (level with masking tape on it)
4. Drill holes in grid pattern 2 foot squares ( could I make squares bigger, or not recommended )
5. Raise screws up to meet datum line.
Thanks to everybody for your previous help. I now appreciate how skilled the pros are it is not easy at all.
Phil.
 
As long as you're level between the screws you're fine making them 10 meters apart.

It just becomes a nightmare trying to stay level when you don't have something close as a point of reference.
 
As long as you're level between the screws you're fine making them 10 meters apart.

It just becomes a nightmare trying to stay level when you don't have something close as a point of reference.

Cheers Dan
Was thinking that, will do 2-3 foot apart. Do I need to put any primer on existing SL. I did put some pva on thinking it was good enough to tile onto of which I just found out I shouldn't have used pva.
 
Evening Phil, sorry to have not replied earlier. 2 to 3 ft should be ideal. I prime slc between coats though I know others don't, however you're going to have to shift that pva sorry. If you applied it really dilute you may have got away with it. You'll have to check its soaked into the floor and not formed a skin. Good luck with it and keep us posted.
 
Evening Phil, sorry to have not replied earlier. 2 to 3 ft should be ideal. I prime slc between coats though I know others don't, however you're going to have to shift that pva sorry. If you applied it really dilute you may have got away with it. You'll have to check its soaked into the floor and not formed a skin. Good luck with it and keep us posted.

Thanks for getting back to us Rich.
The pva was really diluted luckily as it was the dregs out of a few old bottles so no skin. Have you personally done this method if so is it fairly easy to get it level with the screws , do you still have to trowel it in between the screws .Also can I just prime it with sbr without the cement.
Cheers Phil.
 
Yep, once you've got the screws level just pour away. Slc as the name suggests pretty much sorts itself out if you get the mix right. Obviously some flow better than others. I prefer not to interfere with it so only use a trowel to guide it. With regards to priming just follow the instructions on the bottle. No need to slurry.
 
Yep, once you've got the screws level just pour away. Slc as the name suggests pretty much sorts itself out if you get the mix right. Obviously some flow better than others. I prefer not to interfere with it so only use a trowel to guide it. With regards to priming just follow the instructions on the bottle. No need to slurry.
Cheers Rich will let you know how it goes.
Phil.
 
Why not? I wouldn't be at all happy just applying SBR to the bitumen. Even adhesive manufacturers advise to slurry coat bitumen coverings
Completely agree, always slurry coat bitumen. This floor has already been slurried and slc applied, unfortunately not up to a standard ready for tiling. The advice I was giving was based on applying further compound over what's already down.
 
Evening Phil, sorry to have not replied earlier. 2 to 3 ft should be ideal. I prime slc between coats though I know others don't, however you're going to have to shift that pva sorry. If you applied it really dilute you may have got away with it. You'll have to check its soaked into the floor and not formed a skin. Good luck with it and keep us posted.

Hi Rich
Was a bit nervous before I started but it went ok. There was a big difference in levels after I mapped out the screws so I decided after a few buckets that I was going to do it in 2 pours. I have got most of it around 4-5mm under the screw heads and there a few in the middle around 5-7mm. So I will do another pour tomorrow starting with the higher ones and I feel pretty confident that I will get it pretty good..I wont go right up to the head should get it level before then. It was a lot better with the screws it gives you an easy reference, if not you are really working blind if you have varying thickness to cover. I feel a bit more confident troweling it as first time I done it I thought it was curing but the water comes to the top so you get a fair amount of time.
Really pleased to have helped, it's what this forum is all about. I've been tiling 20+ years but am still regularly learning new tricks, methods etc through the solid advice you'll find on here.
 
Really pleased to have helped, it's what this forum is all about. I've been tiling 20+ years but am still regularly learning new tricks, methods etc through the solid advice you'll find on here.
Have to agree Rich very good site and everybody very helpful. Thanks again.
Phil.
 
Really pleased to have helped, it's what this forum is all about. I've been tiling 20+ years but am still regularly learning new tricks, methods etc through the solid advice you'll find on here.

Would just like to thank everybody for there helpful advise during this thread. I have finally got a decent surface to tile onto( hooooooray). I just have one more question for now about trowel notch size. Before I have used this huge one about 20mm I think bought from diy store. I have been investigating a bit and read a sticky on here saying 10 for good floor 13 for bad. Have tried to get a 13 but could only get 10. The floor is pretty good maybe 2-3mm out in some places over 8-10 foot.Will the 10 be ok?
Thanks Phil.
 
Should be fine with the 10, just don't rely on the notch alone. Back butter each tile and keep checking for flatness with a straight edge or level. Lift the occasional tile to check adhesive coverage. You can prime the slc before tiling. Not strictly necessary but you might find it helpful if you're using a fast set addy.
Best of luck.

Cheers Rich
I take it putting adhesive on tile instead of floor is a no no this is how I have done it in the past. I seem to get in a big mess if I apply it to floor. I did see a tip about when you put a tile next to the one you have down is to butt it up against it and push it away for the spacer. What I used to do is leave a gap then push tile into spacer and have a load of addy in the joint. I have learnt that back buttering is for better adhesion but does it also help with setting. You suggested straight edge of level is that just to get them flat but not particularly level.
Thanks Phil.
 
You definitely need to be trowelling the addy to the floor, I tend to trowel in straight lines but everyone's different. Use the flat edge to give a scrape coat to the back of every tile. Butt the next tile to the previous, push it into the adhesive and pull it away. Once you've got 3 or 4 down, check for flatness with your level. Level is a bonus but tiles should always be flat! Back buttering in to ensure your getting the best bond you can, won't really affect setting times.
 
You definitely need to be trowelling the addy to the floor, I tend to trowel in straight lines but everyone's different. Use the flat edge to give a scrape coat to the back of every tile. Butt the next tile to the previous, push it into the adhesive and pull it away. Once you've got 3 or 4 down, check for flatness with your level. Level is a bonus but tiles should always be flat! Back buttering in to ensure your getting the best bond you can, won't really affect setting times.
Hi Rich
I have got a few down and it is going very well. The best floor I have done thanks to the prep, just plonk them on bit of a twist. When I have done it before I did not prep floor and ended up packing all the tiles so I did not want to do that again.
 
You definitely need to be trowelling the addy to the floor, I tend to trowel in straight lines but everyone's different. Use the flat edge to give a scrape coat to the back of every tile. Butt the next tile to the previous, push it into the adhesive and pull it away. Once you've got 3 or 4 down, check for flatness with your level. Level is a bonus but tiles should always be flat! Back buttering in to ensure your getting the best bond you can, won't really affect setting times.
Hey rich,

Done quite a few walls/bathrooms/kitchens now and 4 floors all reasonably good but not as pan flat as some I've seen on here. On the floors and walls I've always just put adi on surface and laid the tiles. Why does back buttering tile with scrape coat help with adhesion ? Also do you do this on wall tiles as well? Thanks.
 

Advertisement

Thread Information

Title
Preparing A Concrete Floor For Tiling - Floor Has Bitumen Down
Prefix
N/A
Forum
Australia Tiling Forum
Start date
Last reply date
Replies
53

Advertisement

Tilers Forums Official Sponsors

UK Tiling Forum; UK

Thread statistics

Created
philrab66,
Last reply from
outcycling,
Replies
53
Views
21,746

Thread statistics

Created
philrab66,
Last reply from
outcycling,
Replies
53
Views
21,746
Back