Installing electric underfloor heating - Step by Step Guide

UK Tiling Forum; Established 2006

Welcome to the UK Tiling Forum by TilersForums.com, built in 2006 by Tilers, run by Tilers.

View all of the UK tiling forum threads, questions and discussions here.

I

Ian

Just thought I knock up a thread with step by step pictures of an electric underfloor heating installation.

Bare concrete floor (primed), 9 square metres. 100mm thick so was left 3 months to dry before I even thought about starting the job.
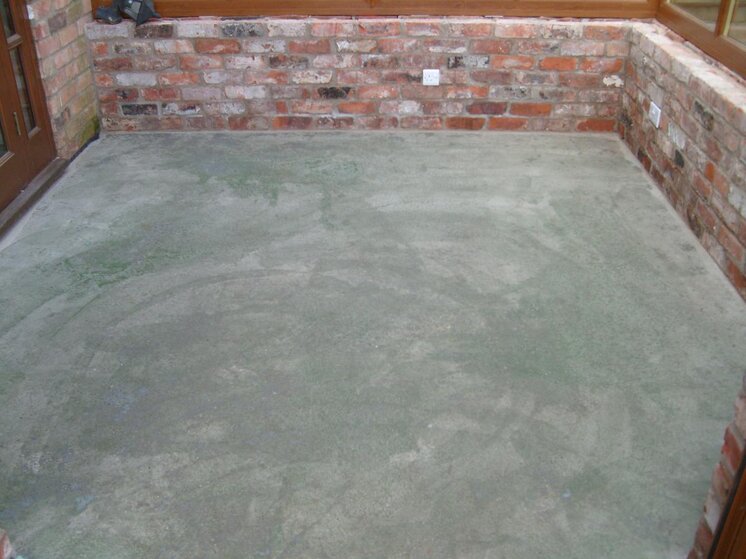
UFH fit 001.jpg

6mm insulation boards staggered and stuck to the substrate using a single part, flexible cement based adhesive. 1st picture, work in progress.
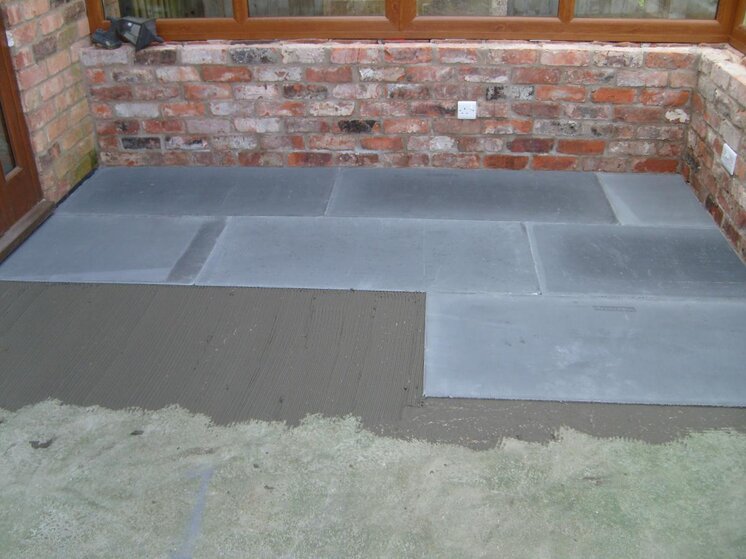
UFH fit 002.jpg

2nd picture, insulating complete. This particular brand says to butt joint the insulation boards so no need to leave expansion gaps between boards (check the manufacturers instructions).
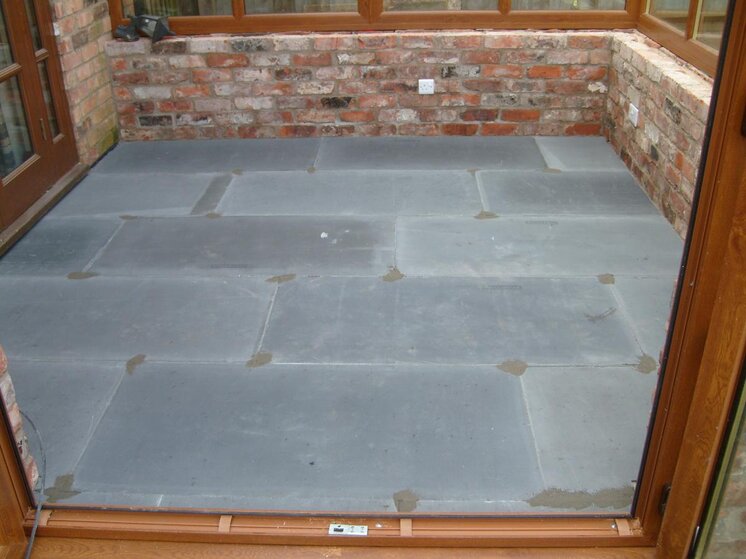
UFH fit 003.jpg

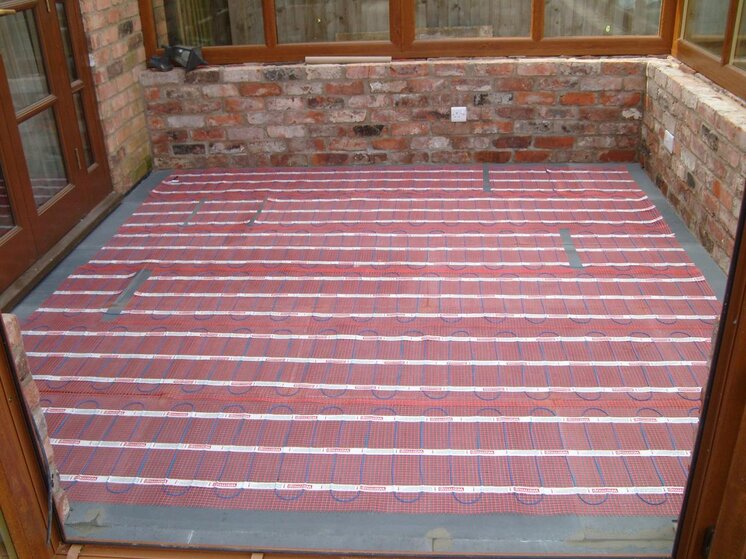
(Check the mat is working and not damaged before this stage commences). Roll the mat out but do not stick it down until you are sure you have evenly covered the area and you are happy with the positioning. (This floor is 9m2 so the mat purchased is 8m2, remember the mat CAN NOT be shortened). To make turns in the mat cut the mesh but be VERY careful not to cut the wire, in the image below you can see where I have opened the mat up in places to get an even distribution. When you are happy with the positioning of the mat stick it down (this one has double sided tape on the underside). It is also worth mentioning at this point that when you roll the mat out make sure the power cable is closest to where the thermostat is going to be positioned.
UFH fit 004.jpg

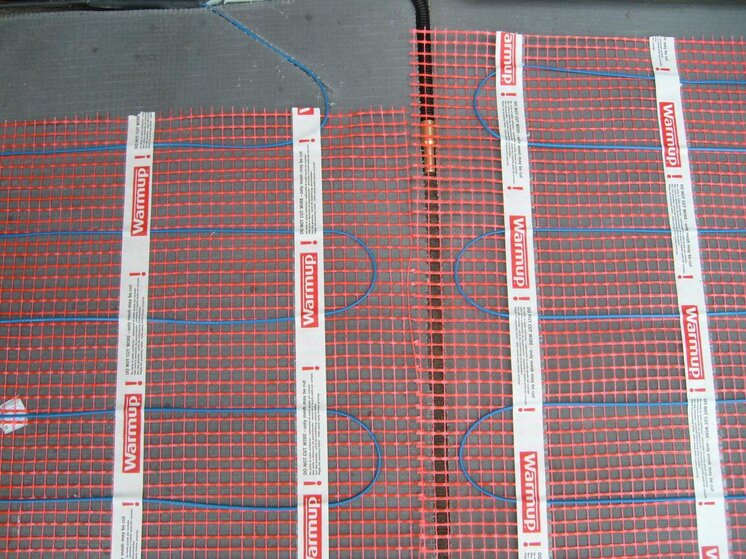
In the same corner/part of the room you will now need to put the thermostat probe into the floor. This one is 200mm into the room (minimum for this manufacturer is 150mm. Check before fitting for different brands) and is placed in a conduit for protection. Make sure the probe DOES NOT go underneath any of the wires, this could cause the mat to malfunction or burn out and fail.
UFH fit 005.jpg

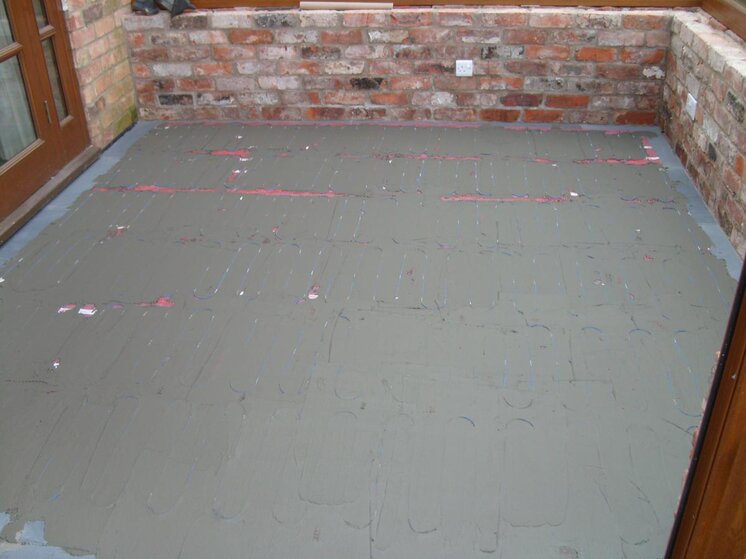
It is also worth mentioning that regular checks should be done throughout the fit to ensure the heating cable is still working and has not been damaged at any point. This mat came with a 'watchdog' that the power cable is connected to, and sounds an alarm if there is a break in the circuit from damage. Next stage cover the mat in flexible adhesive (same as the one used to fix the insulation boards), again be careful not to damage the mat, and stick down any bits of cable or mesh that are protruding. This stage could be skipped but I find it useful for sticking down any awkward bits of cable or mesh that won't lay flat.
UFH fit 006.jpg

Final stage (apart from electrical installation) is to put a flexible self levelling compound over the whole area.
UFH fit 007.jpg

When this has been given time to cure (48 hrs is ample) the electrical connection can be made and thermostat connected (by a qualified electrician) and the floor can be commissioned. This must be done before any tiling commences and the UFH must be switched off 24 hrs prior to the floor covering being laid.

Always read the instructions supplied with the product as there will be variation from each manufacturer.
I hope this is of use to somone and I hope I haven't left anything out! I'm sure someone will let me know if I have :thumbsup:

UFH fit 001.jpg UFH fit 002.jpg UFH fit 003.jpg UFH fit 004.jpg UFH fit 005.jpg UFH fit 006.jpg UFH fit 007.jpg
 
Re: Fitting electric underfloor heating.

yeah cheers for that bri.Got 1 coming up in nxt few weeks but with the loose cable instead of matting.1 thing,other than to encase the matting in the slc why would you self level instead of just being careful and trowelling addy straight over the matting?
 
Re: Fitting electric underfloor heating.

yeah cheers for that bri.Got 1 coming up in nxt few weeks but with the loose cable instead of matting.1 thing,other than to encase the matting in the slc why would you self level instead of just being careful and trowelling addy straight over the matting?

Its really important to get the mat fully encased in adhesive/SLC to prevent any voids and hot spots, which can cause the mat to malfunction or worst case scenario, burn out. It can be done by fixing straight to it but you have to be careful not to damage the wire with the trowel, SLC gives you a nice flat surface to tile to aswell, and will ensure 100% adhesive coverage under the tile.
 
Re: Fitting electric underfloor heating.

data stick 034.jpg

I lay my thermal boards as above to minimise the length of joints between the boards.

Not saying your way is wrong Bri, just showing another way :thumbsup:

data stick 034.jpg
 
Re: Fitting electric underfloor heating.

Brill thread, and very handy for anyone who hasn't attempted UFH.

Just an added note..............warm up mats self adhesive tapes can be a bit hit and miss, so a glue gun can be handy for those pain in the butt bits that just will not stay still. Also allow a good 5/10mm of latex self levelling.

Good point, I forgot to mention the thickness of the SLC :thumbsup:
 
Re: Fitting electric underfloor heating.

i was planning on laying thermal boards then wire ufh then addy with a plastic trowel,but uve put an idea in my head now with the slc.Do u reckon the thermal boards directly over tongue n groove boards will be adequate?They seem solid enough,no deflection.
 
Just thought I knock up a thread with step by step pictures of an electric underfloor heating installation.

Bare concrete floor (primed), 9 square metres. 100mm thick so was left 3 months to dry before I even thought about starting the job.
View attachment 26122

6mm insulation boards staggered and stuck to the substrate using a single part, flexible cement based adhesive. 1st picture, work in progress.
View attachment 26123

2nd picture, insulating complete. This particular brand says to butt joint the insulation boards so no need to leave expansion gaps between boards (check the manufacturers instructions).
View attachment 26124

(Check the mat is working and not damaged before this stage commences). Roll the mat out but do not stick it down until you are sure you have evenly covered the area and you are happy with the positioning. (This floor is 9m2 so the mat purchased is 8m2, remember the mat CAN NOT be shortened). To make turns in the mat cut the mesh but be VERY careful not to cut the wire, in the image below you can see where I have opened the mat up in places to get an even distribution. When you are happy with the positioning of the mat stick it down (this one has double sided tape on the underside). It is also worth mentioning at this point that when you roll the mat out make sure the power cable is closest to where the thermostat is going to be positioned.
View attachment 26125

In the same corner/part of the room you will now need to put the thermostat probe into the floor. This one is 200mm into the room (minimum for this manufacturer is 150mm. Check before fitting for different brands) and is placed in a conduit for protection. Make sure the probe DOES NOT go underneath any of the wires, this could cause the mat to malfunction or burn out and fail.
View attachment 26126

It is also worth mentioning that regular checks should be done throughout the fit to ensure the heating cable is still working and has not been damaged at any point. This mat came with a 'watchdog' that the power cable is connected to, and sounds an alarm if there is a break in the circuit from damage. Next stage cover the mat in flexible adhesive (same as the one used to fix the insulation boards), again be careful not to damage the mat, and stick down any bits of cable or mesh that are protruding. This stage could be skipped but I find it useful for sticking down any awkward bits of cable or mesh that won't lay flat.
View attachment 26127

Final stage (apart from electrical installation) is to put a flexible self levelling compound over the whole area.
View attachment 26128

When this has been given time to cure (48 hrs is ample) the electrical connection can be made and thermostat connected (by a qualified electrician) and the floor can be commissioned. This must be done before any tiling commences and the UFH must be switched off 24 hrs prior to the floor covering being laid.

Always read the instructions supplied with the product as there will be variation from each manufacturer.
I hope this is of use to somone and I hope I haven't left anything out! I'm sure someone will let me know if I have :thumbsup:

Brilliant post. I've edited the title to something that I think will attract a bit more attention to the thread. :thumbsup: - hope that's okay.
 
Re: Fitting electric underfloor heating.

I hate the tape on the mats!, I think they should just do away with it.

Do you guys trowel out the SLC by eye or use markers? I tend to go by eye over UFH unless the floor is really bad then I use markers.

Did you see polishtradesman's post the other day with the metal rails that he lays level and then brings the slc up to it? Looks like a good idea.
 
Just click the link back tab above and you can tweet direct from the thread.

Tilers forums doesn't have a tweet account , unless Dan has set one up..
 
Re: Fitting electric underfloor heating.

Nice one Bri,

I am just about to lay insulation boards prior to UFH. Unlike yours mine have come without instructions so curious whether I should butt joint or leave expansion gaps. Most info on web suggess that you leave expansion gaps and fill with Flexi ady.

What do the experts think?

Thanks in advance
 
If in doubt, leave a 2mm expansion joint. May be worth contacting the manufacturer or supplier to see what they recommend.


Sent via Tapatalk for iPhone
 
Cheers for guide Bri. Needed a refresher for a job coming up. Good to be re-assured that what I was going to do was right with the addition of S.L.C.
 
Good thread, Ive only ever used the boards once & that was 4 years ago now! Very useful info and has certainly refreshed my memory, cheers Bri.
 
Great post this sort of information is massively helpful to beginners and even experts as it clearly outlines the correct method. You would not believe the stories we could tell of what some people try and do when laying ufh.
The only information I would add is how to test the mat prior to laying it.
1[SUP]st[/SUP] Never connect the mat or cable to the mains power when rolled up as the heat in the middle of the role has nowhere to go and the cable will simply over heat very quickly.
You mention testing it during instillation and the watchdog that the mat you fitted came with but what if this is not supplied. Having a cheap multi meter £5-10 ish we have found is the best way to test mats. You can do a simple continuity test, resistance reading and insulation test all of which can be very useful readings and very easily obtained with this devise. The better units also have a watchdog type facility which will sound should you damage the mat during instillation / tiling. The reading you can get from these devises can be very useful especially if you ever have problems later down the road.
I hope this adds something useful.
[FONT=&amp]Andrew Knight.[/FONT]
 
Cool post..Why do you need to apply the self levelling over the tile adhesive screed?
 
Cool post..Why do you need to apply the self levelling over the tile adhesive screed?

Apart from making a level surface to tile onto, it also protects the cable when troweling the adhesive as well as fully encapsulating it to ensure no air pockets and an even transference of heat to the tiled surface.
 
As above.

I happened to of quoted for a UFH install last week and was asked the same question about the SLC. Another thing I mention is if you ever have to break out and replace a broken tile. Less risk of damaging the wire if it's in SLC and not burried in the adhesive.
 
Was wondering why you don't just pour over the mats in one pour instead of thin set first? Seems to cut out one more steep and the tape on the Warmup mats will hold very well to the primed surface of the boards.
 
Was wondering why you don't just pour over the mats in one pour instead of thin set first? Seems to cut out one more steep and the tape on the Warmup mats will hold very well to the primed surface of the boards.

I find there's always a bit of cable that floats. I've tried both ways and putting a layer of adhesive down before SLC gives a better finish and also takes away the risk of snagging a cable when SLCing.
 

Advertisement

Thread Information

Title
Installing electric underfloor heating - Step by Step Guide
Prefix
N/A
Forum
UK Tiling Forum
Start date
Last reply date
Replies
41

Advertisement

Tilers Forums Official Sponsors

UK Tiling Forum; UK

Thread statistics

Created
Ian,
Last reply from
dean mckeown,
Replies
41
Views
41,378

Thread statistics

Created
Ian,
Last reply from
dean mckeown,
Replies
41
Views
41,378
Back