- Reaction score
- 2
Hi
I've had a leak from the shower to the room below. I thought it was likely the silicone seal first, so redid all silicone and removed and refitted shower enlosure.
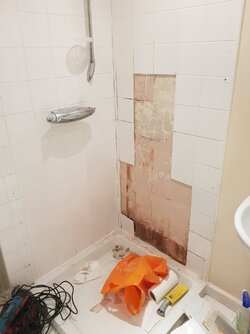
The leak came back, so I cut out the ceiling below to see what the problem was. The drips were coming though the bottom of the plaster. So I taped a plastic sheet over the offending shower wall as a temporary measure and it was bone dry since. I tested the silicone seal again and that was fine too. I've now removed the sheet and its leaking again. So even though the grout was rock solid (could barely scratch it wiht a stanley knife) I'm pretty sure its the grout. No cracks in the tiles either.
I bought a multi-tool today with grout attachment and some Kerakoll Fugabella, with the intention of removing and re-grouting.
The bottom few tiles came away as I removed the grout. I kind of expected that but as I've raked the grout further up the walls the tiles are simply coming away. It's also taken what looks like a 1mm plaster skim away from the original plaster.
The house was renovated just before I moved in, and bathroom completely new 14 years ago. I don't think it's tanked at all (sorry I am not a tiler so have not much clue with this - be gentle!)
I'm concerned I'm going further down the rabbit hole, but want to repair if I can rather thna give up at the first hurdle and call in the pro's. I don't want to bodge it though.
My questions...
1) Shall I carry on removing the grout, removing any loose tiles with a view to fixing them back?
2) What should be under those tiles? It looks at the moment to be a very thin skim on top of the solid old wall
3) The tiles are 147mm x 147mm 5mm thick. I can't find any of these online, just lots of 150mm and these are all 147mm. Any ideas? Removing the adhesive on these will be a ballache.
All good advice greatly appreciated. Thanks!
I've had a leak from the shower to the room below. I thought it was likely the silicone seal first, so redid all silicone and removed and refitted shower enlosure.
The leak came back, so I cut out the ceiling below to see what the problem was. The drips were coming though the bottom of the plaster. So I taped a plastic sheet over the offending shower wall as a temporary measure and it was bone dry since. I tested the silicone seal again and that was fine too. I've now removed the sheet and its leaking again. So even though the grout was rock solid (could barely scratch it wiht a stanley knife) I'm pretty sure its the grout. No cracks in the tiles either.
I bought a multi-tool today with grout attachment and some Kerakoll Fugabella, with the intention of removing and re-grouting.
The bottom few tiles came away as I removed the grout. I kind of expected that but as I've raked the grout further up the walls the tiles are simply coming away. It's also taken what looks like a 1mm plaster skim away from the original plaster.
The house was renovated just before I moved in, and bathroom completely new 14 years ago. I don't think it's tanked at all (sorry I am not a tiler so have not much clue with this - be gentle!)
I'm concerned I'm going further down the rabbit hole, but want to repair if I can rather thna give up at the first hurdle and call in the pro's. I don't want to bodge it though.
My questions...
1) Shall I carry on removing the grout, removing any loose tiles with a view to fixing them back?
2) What should be under those tiles? It looks at the moment to be a very thin skim on top of the solid old wall
3) The tiles are 147mm x 147mm 5mm thick. I can't find any of these online, just lots of 150mm and these are all 147mm. Any ideas? Removing the adhesive on these will be a ballache.
All good advice greatly appreciated. Thanks!


")